
Member photo on ChurchofJesusChrist.org
Did you know that you can upload individual and family photos to your ward directory using ChurchofJesusChrist.org or the Member Tools mobile app? You can then choose who can see the photos: just your ward, your stake, or only your leaders.
Adding a photo to your Church profile can help other ward and stake members recognize you and connect your name with your face.
How to Add Your Photo to Your Church Account
Using ChurchofJesusChrist.org:
- Log in to ChurchofJesusChrist.org.
- Click My Account and Ward in the upper right corner and choose Ward Directory.
- Search for your name.
- To update your household photo, click the pencil edit button. Choose Photo and upload your favorite photo.
- To update your individual photo, click your name first and then click the pencil edit button. Choose Photo and upload your favorite photo.
- After uploading your photo, click Privacy to indicate who you want to be able to view your photo. (Private means it will be visible only to ward council and organization leaders. Ward Visibility means it will be visible to ward members and leaders. Stake Visibility means it will be visible to ward and stake members and leaders.)

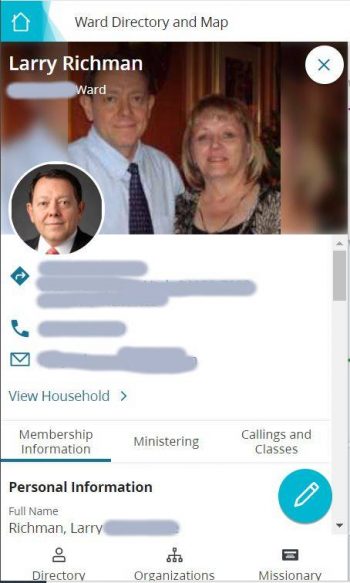
Member photo in Member Tools app
Using the Member Tools app:
- Tap Directory in the bottom left.
- Select your name.
- Select Individual or Household photo and then tap Edit in the top right to upload or change a photo.
- On the Household screen, tap Edit in the top right to choose your privacy settings to indicate who you want to be able to view your photo. (Private means it will be visible only to ward council and organization leaders. Ward Visibility means it will be visible to ward members and leaders. Stake Visibility means it will be visible to ward and stake members and leaders.)
Before your photos will be viewable, they have to be approved by an administrator (usually a member of the bishopric). Administrators do not receive e-mail notifications about new photos awaiting approval, so they need to regularly check the New Photos section in the directory. They should verify that the photos match the member names and that the photos comply with the guidelines for photos. Administrators can also upload a photo on behalf of a member who needs help.
How to View Your Ward Directory and Photos
Using ChurchofJesusChrist.org:
- Log in to ChurchofJesusChrist.org.
- Click My Account and Ward in the upper right corner and choose Ward Directory.
- Along the bottom of the left column, choose the following:
- Click Directory to scroll through the members. Click on a name to see photos and contact information.
- Click Organizations to see leaders.
- Click Missionary. Along the top of the column, click Assigned to see the missionaries assigned to your ward. Click Ward to see your ward missionaries. Click Serving to see missionaries from your ward who are serving in other missions.
Using the Member Tools app:
- Tap Directory in the bottom left and tap on a name to see photos and contact information.
- Tap Organizations to see leaders.
- Tap Calendar to see scheduled ward and stake activities.
- Tap Reports to see reports authorized for your calling.
- Tap More to see
- Tap Lists to see lists you have created.
- Tap Missionaries to see missionaries Assigned to your ward. Other shows your ward missionaries. Serving shows the missionaries from your ward who are serving in other missions.
- Tap Meetinghouses to search for meetinghouses anywhere in the world.
- Tap Temples to see information about your assigned temple.
Continue reading at the original source →